


T802 ultra-thin dual-recording high-definition driving recorder
Product Specifications:
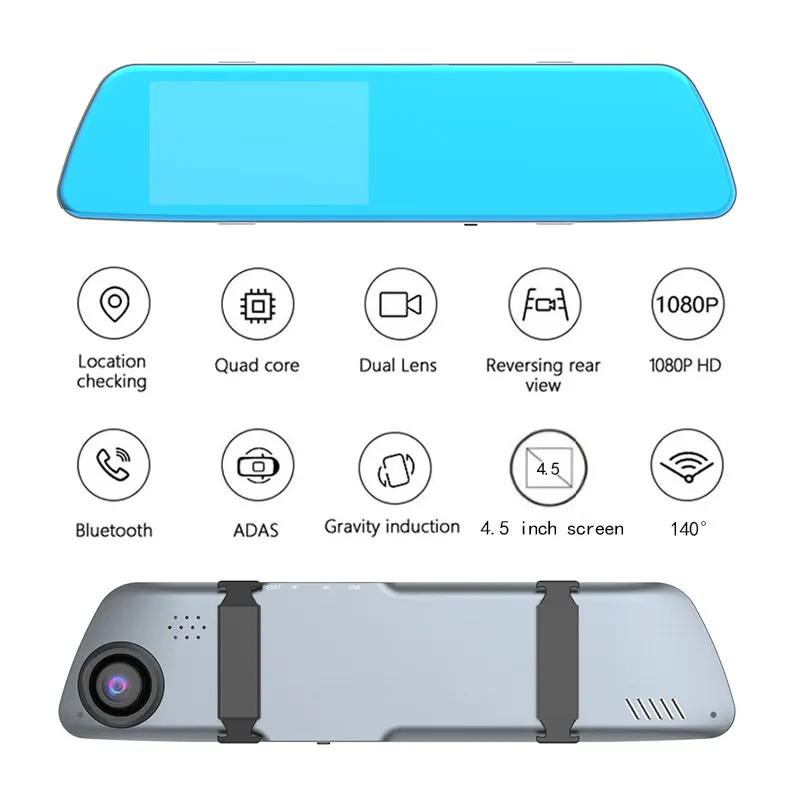
Built-in image sensor: 120W
Rear camera resolution: 640x480
Lens angle: 140 degrees
Language options English/Traditional/Simplified Chinese/Japanese/French/German/Korean/Italian/Portuguese/Russian/Spanish/Thai
TF memory card slot: micro TF
Video resolution: 1080P (FHD1920x1080), 720P (HD1280x720),
Photo resolution: 1M (1280x720), 2M (1600x912), 3M (1920x1088)
Storage compression method: M-JPEG
Video format: AVI
Picture format: JPEG
Storage temperature: -30℃~70℃
Working temperature: 0℃~50℃
Working humidity: 15-65%RH
Memory card capacity: maximum support 32 GB
product structure:
Image sensor Full HD
Display 4.3-inch high-definition digital screen
Lens: All-glass wide-angle lens + high-resolution multilayer filter
Video specification: AVI
Picture format: JPEG
Transmission rate: USB2.0
Power interface: 5V 1.5A
Capacity support: up to 32 GB
Built-in speaker: 8R 1W
Built-in high-fidelity recording speaker
Built-in lithium polymer battery
Appearance and key function description
Open M OK
1. Power button/screen backlight switch
Function 1: Switch function
In the shutdown state, long press [Power Key] for 3 seconds to turn on the local power supply, and the machine will automatically start working. In the power-on state, press the power button and hold it for 3 seconds. The machine automatically saves video files and user settings and shuts down.
Function 2: Screen backlight switch
In the standby state, when the screen is on, press the power button to turn off the screen backlight, and then press the power button to turn on the backlight
2.M key
Function 1: In the video mode, click [M key] to take a photo and automatically save it to the TF card.
Function 2: Enter photo/video playback/time setting/shutdown, click [M key] in the mode to return to the main interface
3. Volume up
Function: In the power-on state or video playback mode, you can adjust the volume to increase [] to feel the sound, each time the sound is loud, and a total of 5 tones can be adjusted from the smallest to the largest.
4. Reduced size
Function 1: In the power-on state or in the video playback mode, the sound feels loud, you can click to decrease the volume [Lower], each click of a small tone, from the largest to the smallest, there are 5 adjustable tones.
5. Confirm button/Video button/Photograph button/Play button
Function 1: Video button
In the recording mode, click the confirm button to start recording, and then click the confirm button to stop recording.
Function 2: Camera button
In the photo mode, click the OK button to take a photo.
Function 3: File playback button
In the file browsing mode, short press the [Confirm Key] to play the video again, and short press the [Confirm Key] when the video is paused.
Installation guide
1. Turn off the car engine.
2. Insert the card into the card slot.
[Note] Please use a high-speed TF card (above Class6), the capacity is not less than 4GB, and the maximum support is 32GB TF card.
3. Fix the recorder on the rearview mirror of the car.
4. Insert the car charger into the cigarette lighter of the car.
5. Use the charging extension cable to connect the USB port of the recorder to the car charger.
Note that the charging extension cable can be laid along the edge of the windshield when wiring.
6. The rear camera is installed at the rear of the car, pay attention to the installation direction. The wires can be laid along the roof of the car. After installation, insert the rear plug into the recorder AV-IN.
7. Adjust the position of the lens to ensure that the lens is level with the ground.
8. Start the engine and check whether the machine is installed correctly.
[Note] After the machine is installed correctly, the system working light is on; the machine starts to enter the video state, and the video indicator flashes. Please check whether the display screen is normal, if you need more display screens, please contact us.
Five. Function introduction
1. Use the automatic recording function
Start the car engine, the recorder will automatically start and turn on the recording function, turn off the car engine, the recorder will automatically save the recording content and shut down. The recorded images are divided and saved in the TF card. When the TF card is full, the recorder will overwrite the earlier recorded images. The recording time can be set in the menu by itself, and the range is /2 minutes, /3 minutes, and /5 minutes, in three levels.
【Notice】
If you select A. is the minutes of three files of "random 1/2/3", when the TF card is full, the recorder will overwrite the earlier recorded images; if you select (off) has been recorded so far, it will not Overlay the video.
B. Save the video files and photo files before and after the camera in the "DCIMA folder" and "DCIMB folder" in the TF card respectively
2. Use manual recording function
Short press the recorder [power button], the recorder will start and start recording automatically, if you need to shut down again, long press the [power button] for 3 seconds, the recorder will automatically save the recording and shut down. In the power-on state, tap the [Video] menu on the screen to enter the recording mode, and the icon at the bottom of the screen will be displayed [Mute Button/Lock/Stop Recording/Lens Switch] [Settings] the upper left icon [Return] and [License Plate] Settings].
1. One-key mute
You can touch the video menu on the screen to record the video. In the video interface, there is a "button mute" contact, a button to mute, and a diagonal red line to mute. Re-contact【one-key mute】to cancel the mute.
2. [Lock]
In the recording state, contact [Lock] to lock the current file, and then contact [Lock] to cancel the locked file.
3. [Video]
Contact the [Video] menu to start the video, and re-contact the [Video] menu to cancel the video.
4. [lens switching]
Touch the [Lens Switch] menu to start switching, then pull the camera, and then touch the [Lens Switch] menu before switching cameras.
5. [environment]
Contact [Settings] menu to enter the setting interface, the screen shows 4 pages of video settings; each page has 4 main menus,
The first page menu has resolution, loop recording, night vision enhancement, exposure compensation
The menu on the second page has "Date Tag", "Gravity Sensor", "Parking Monitoring" and "Auto Power Off"
The menu on the third page has language settings, light source frequency, format, and screen saver
The fourth page of the menu has default settings and versions
(1). [Resolution]
Address book 【Resolution】Enter the interface, there are three resolution options: 1080P, 720P, and VGA. Select the contact and the resolution will turn red. This is the choice. Then contact [Return] and it's OK.
(2). [Loop video]
Contact [Cycle Video] has 4 options to enter the interface
Frequently Asked Questions of Driving Recorder
1: Deadlock: Deadlock means that the power supply is normal, the graphics card is dead, and the screen stays on the screen, and the function does not reflect when you press any key!
(1) First take out the TF card and press the power button to confirm whether it can be turned on
(2) If the machine is not turned on, please find a reset hole on the edge of the fuselage to find (reset) the edge of the character, and press the point to see if it can be turned on. , Slide down, left and right, etc.)
(3) If the machine can be started normally, it means that the TF card is faulty, then format the TF card, then close the TF card and try to start the video. If it is normal, if it still fails to start the card and change the card
Please use SDHC compatible high-speed TF card, high-speed TF card will have C4 or C6 C10 logo.
2: No power on: No power on means that the recorder will not start when the vehicle starts normally
(1) Check whether the cigarette lighter on the car is energized, whether the interface is loose, rusty, or poorly connected.
(2) If the car cigarette lighter is normal, check whether the car charger indicator light is on and whether the USB output interface is powered on. If there is no power to the car charger, change a car charger cable to test. (Note: Different recorders require different output currents from the on-board charger, please consult the merchant's standard plan).
(3) There is no problem with the car charging cable, the voltage is normal, and the video recorder will not be switched on for another video recorder to cross test whether the boot recording is normal. If it is normal again, it will prove that the video recorder is broken (feed back business problem improvements and solutions).
3: The recording will stop automatically, prompting that the card is full, sometimes recording, sometimes not recording, and automatically restarting.
(1) Check whether the video recorder is turned on for loop recording.
(2) Whether the sensitivity of the gravity sensor setting is too high will prompt the card full to lock the video during the driving process (the locked video will not be overwritten, it can only be manually deleted or formatted, and the locked file is deleted on the computer) r).
(3) Detect whether the machine is in the motion detection mode, the machine lens senses the movement of the object and it will start recording. Each recording is 6-15 seconds, and the recording will stop if there is no movement of the object.
(4) Check whether the video recorder has the parking monitoring function. When the parking monitoring is turned on, if the machine itself senses a certain amplitude of vibration, it will start the machine to record. Each recording is usually between 6-15 seconds, or it is automatically set by itself. Close after a period of time.
(5) Whether the car is plugged in and whether the car charger has reached sufficient voltage and current. If the car current is not enough to start the machine, the machine will automatically restart and cannot enter the system.
(6) The general output voltage of ordinary cars is 12V, the general output voltage of small trucks is 12V, the general output voltage of medium trucks is 24V, and the general output voltage of large trucks is 36-V. You need to confirm the output voltage of the vehicle before use. Our conventional factory chargers support wide voltage transmission, generally 12-24V voltage, and the output current of car chargers is generally between 1A and 2A.
There is a problem after the burner
1: Pull the camera back to display, no display, there is picture-in-picture without reversing image, reversing does not display image
(1) The av interface of the burner is not inserted in place, causing looseness.
(2) Reversing 3 meters and the rear camera interface is not plugged in and loose.
(3) With picture-in-picture and no reversing image, the power of the reversing cable is not connected or connected properly. The power cord is generally red to the reversing light line, and black is generally connected to the negative pole.
(4) The reverse is not displayed: the rear camera is not in place, the line is loose, or the extension cable and the camera interface are flooded, which causes the line to burn out, so the reversing signal is detected and the reverse image input is not input.


 배송기간
배송기간